

How To Make An Origami Dragon Easy
Search this Site

Custom Search
Like Origami? Tell your friends!
Most Popular Origami
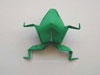
These are currently our most popular origami:


Origami Paper
We use standard size 6 inch x 6 inch (15cm x 15cm) square origami paper for this site unless stated otherwise. If you can, use different types of origami paper to change the look of the finished origami and have fun with it!
- Origami Books and Paper 4-for-Price-of-3
Translate this Site
Tweets by @OrigamiSensei
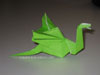
Origami Dragon
The origami dragon is challenging but fun to make. It is not for beginners, but if you have made the origami bird base and the origami flapping bird, then you should be able to follow the steps below.
Made this origami? Comment and Submit your photo using the comment box at the end of this page!
You can watch our Origami Dragon Instructions Video, or follow the step-by-step photo instructions below.
Origami Dragon Step 1: To make this origami dragon, start with the origami bird base. Fold the opposite corners of the diamond to the centerline as shown.


Origami Dragon Step 2: Now fold the rear flap down and back:


Origami Dragon Step 3: Fold the corner A upwards. Next, fold the corner B back and downwards:


Origami Dragon Step 4:Now fold the corner C from left to right, around the dotted line:


Origami Dragon Step 5: Now fold corner D backwards to give the result shown below left. It's now time to start making the dragon wings, by fold the edge E-F to the vertical position, as shown below right:


Origami Dragon Step 6: Repeat this fold on the backside to form the second wing. Fold corner E upwards, then repeat on the backside.


Origami Dragon Step 7: Now it's time to start folding the neck of the origami dragon, using a sequence of three (3) reverse folds. The reverse fold is explained in detail in the origami flapping bird instructions. Follow the next ten (10) photos to make the neck of the dragon.


Origami Dragon Step 8: Now make two more reverse folds to form the mouth of the dragon:


Origami Dragon Step 9: Now use reverse folds again to form the tail of the dragon:


Origami Dragon Step 10: Almost there! Now use simple back-and-forth pleat folds to make the wings more dragon-like:
Origami Dragon Step 11: And there you have it! A fearsome, cool looking origami dragon!
We've received many photos of the origami dragon folded by readers. Do check out their photos on Page 2 (more recent) and Page 1 then fold one yourself!
Did you make this origami? If so, upload your photo (2MB limit) via the comment box below. You can login with your Facebook, Twitter, Google or Yahoo accounts.
How To Make An Origami Dragon Easy
Source: https://origami-instructions.com/origami-dragon.html
Posted by: smallwoodfroopped.blogspot.com
0 Response to "How To Make An Origami Dragon Easy"
Post a Comment